In this tutorial, I will show you how to download and set up a MetaMask wallet which is super popular if you want to buy, sell, customize, or breed some CryptoKitties, for example.
Or if you want to play around with NFT platforms, you need a MetaMask wallet. And in this lecture, I will show you how to set up one.
Table of Contents:
MetaMask Tutorial
So by using MetaMask, we are usually capable of purchasing NFTs by connecting this wallet to the NFT platforms. Or this is where we will be storing cryptocurrencies such as Ethereum and we will be using this Ethereum to buy NFTs and at the same time after that, we will be storing these NFTs on the MetaMask wallet.
So this way you are able to buy one NFT from one platform, store it on your MetaMask wallet, and then sell it on another platform. So basically, this way you can transfer NFTs from one place to another. And for the purpose of this MetaMask wallet beginners tutorial, I will download and show you what exactly you need to do.
Creating a new MetaMask wallet
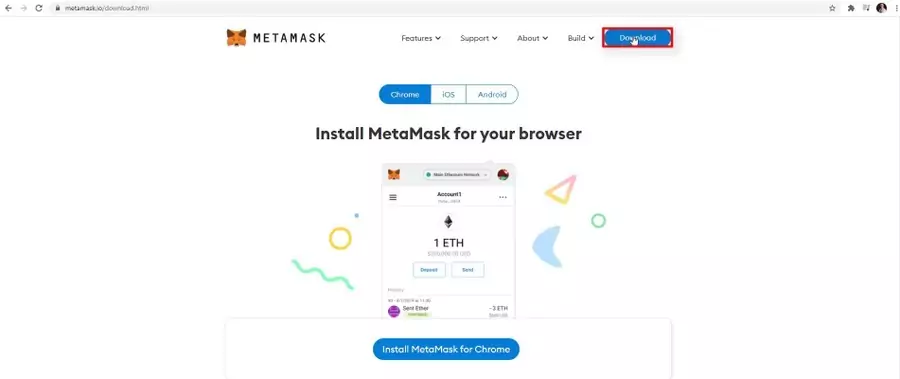
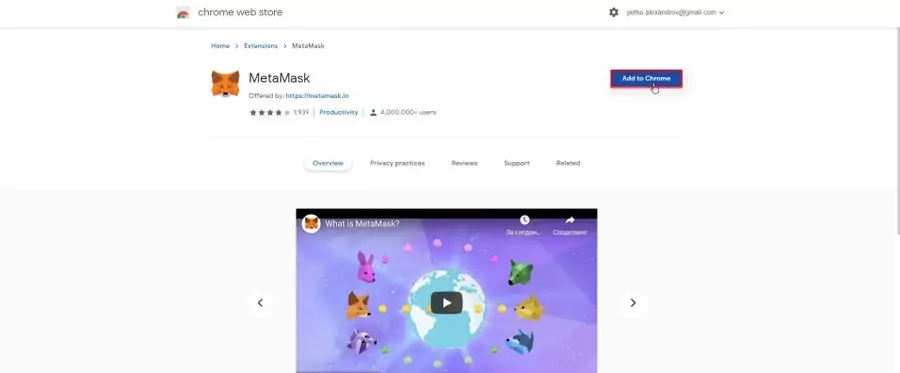
Let’s start this tutorial by opening the MetaMask website. I click on the Download button in the top right-hand corner.
Then I will click on Install MetaMask for Chrome. I will be redirected to the Chrome Web Store, where I need to click on the Add to Chrome button.
And then I will just add MetaMask as an extension.
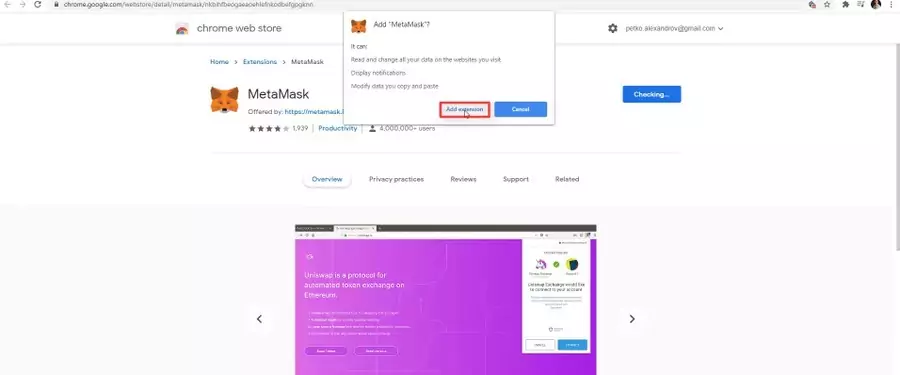
It takes a couple of seconds.
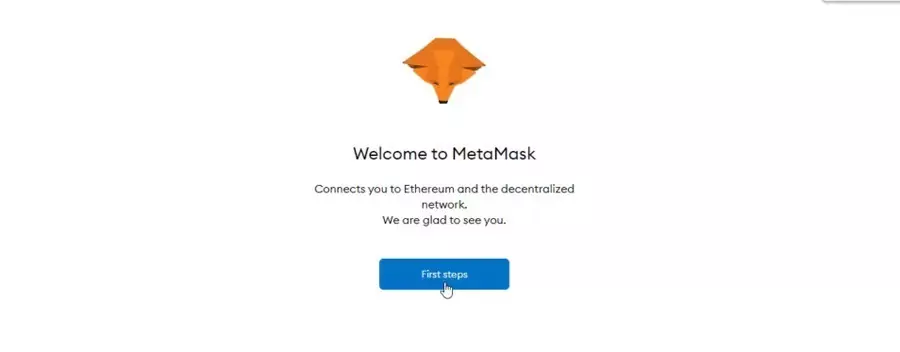
Once it’s done, you will see the “Welcome to MetaMask” message. And it says that it connects you to Ethereum and the decentralized networks. So I click on the First Steps button.
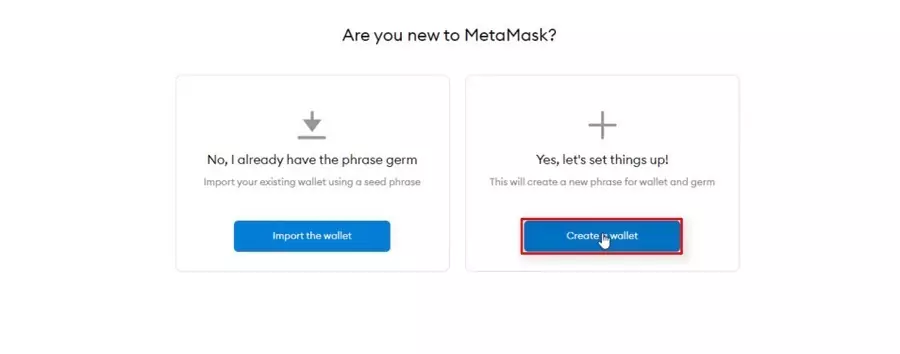
And then I will show you in this tutorial how to create a MetaMask wallet if you’re doing it for the first time. Keep in mind, that if you already have a wallet, you need to import it.
So now I will create a new MetaMask wallet, so if you’re doing it you will see how it works.
And here we see what the MetaMask platform does and what it never does.
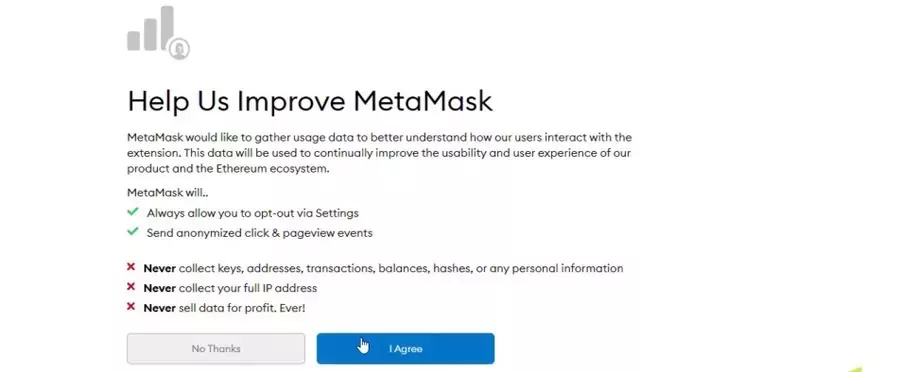
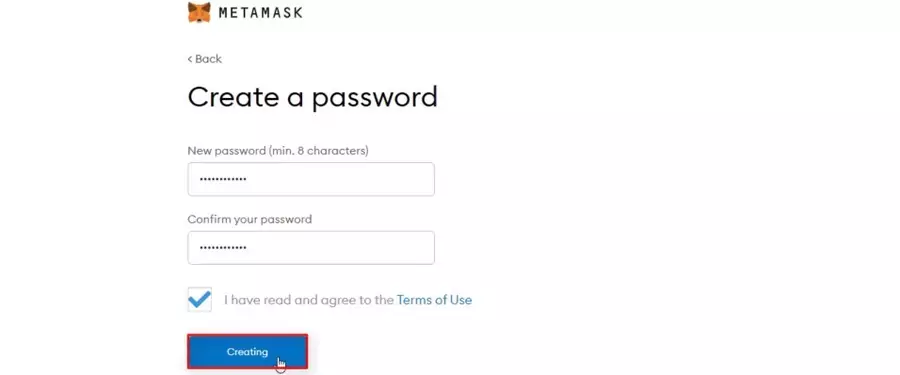
So I agree, and then I need to enter my password. So right now I will be just pasting a password that I will need to confirm. I will agree to the Terms and Conditions and I will tap on Creating.
Of course, I would always advise you to go through the Terms and Conditions for every platform where you’re creating an account.
The secret phrase
And here is my secret backup phrase, which is super important.
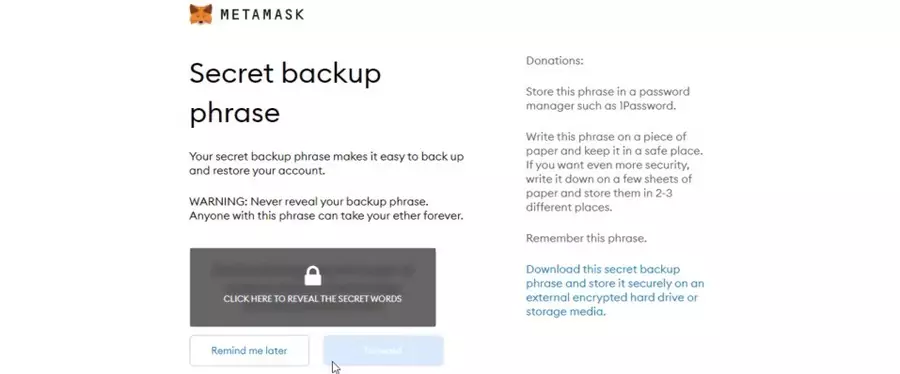
Like every crypto wallet, you will have a secret phrase or words, usually, this is somewhere between 12 and 24 words which you need to write down on a piece of paper and keep offline.
Don’t keep it on your computer, anything connected to the internet, for sure not on a cloud. Because this is how you can easily lose your NFTs and cryptocurrencies if someone actually hacks your computer or network and they get access to this phrase.
So now I will click here to reveal the secret words, I will write down these 12 words on a piece of paper while I’m recording. This is what you need to do as well and never ever share it with anyone, especially if you are planning to keep NFTs on your MetaMask wallet or if you are keeping actually bigger amounts of Ethereum. After that, I will click on Forward.
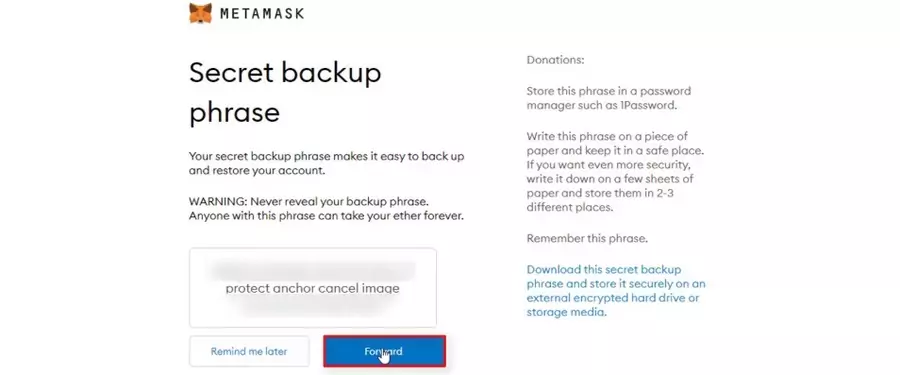
And here, I need to confirm the order of the words.
Creating the MetaMask wallet
And I will just confirm it. It says, “Confirm everything’s ready” and then it just says congratulations. Once again, don’t store your password online, don’t make a copy of it, keep it on a piece of paper, and so on.
So I click on, “Everything is ready”. And here it is, swapping on mobile is here, it’s something new on MetaMask that we may cover in another beginners tutorial.
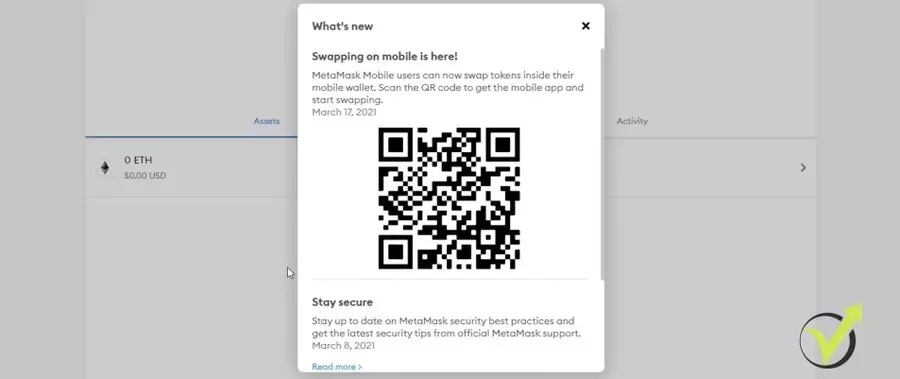
So it says that users can now swap tokens inside their mobile wallet. And this is the QR code if you want to have the MetaMask on your mobile, I will skip that for now. And that’s it, I have my MetaMask ready to use.
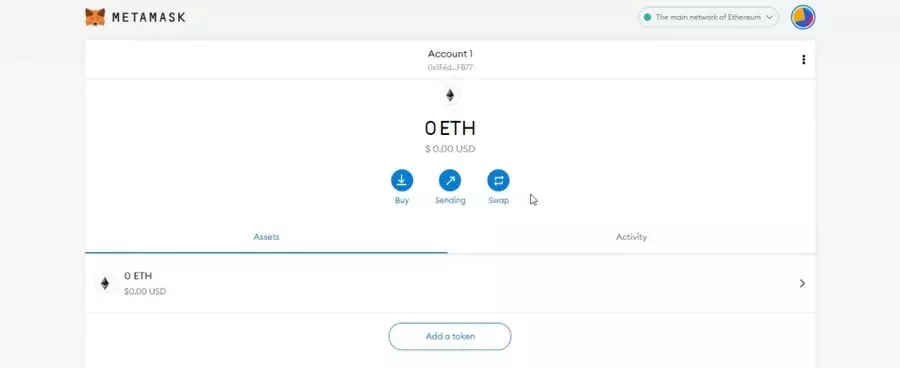
I can buy, I can send or swap tokens. I can use MetaMask to connect it to other platforms like CryptoKitties where we need to have a MetaMask wallet in order to purchase, breed, or customize the Kitties that I’ll be covering in another MetaMask tutorial.
How to add money to MetaTask
I continue this MetaMask tutorial for beginners and I will show you how to add funds to the MetaMask wallet. And I will show you something very important – the difference between buying Ethereum straight from MetaMask or transferring it from an external wallet or exchange. Because when we are transferring Ethereum, there are fees that you need to consider. And I will show you what is the better approach.
So I will share with you my phone as well where I have opened my Crypto.com app. And this is where I have some cryptocurrencies that I use for trading.
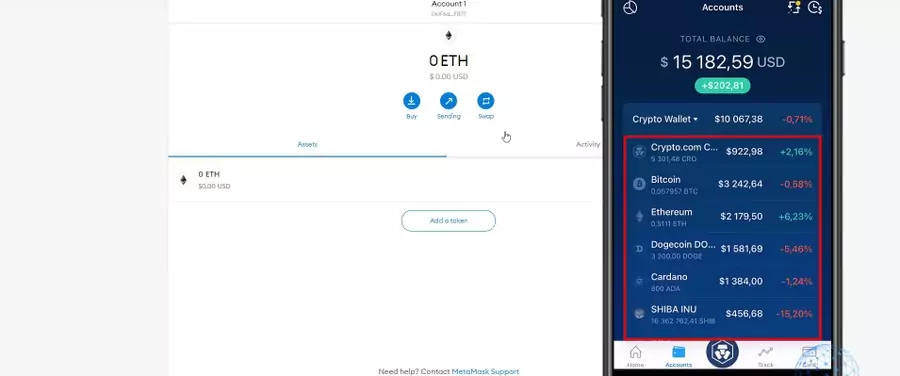
Usually, the cryptocurrencies that I’m investing in for a longer term, I keep on my Ledger hardware wallet because it’s more secure.
So right on this account, I have point 0.5111 Ethereum. I will tap on it. And from here, I can transfer it to my MetaMask wallet, and I will show you what is the difference. Now, if I want to buy Ethereum straight from MetaMask, I can do it.
How to fund MetaMask with debit or credit card
So I will tap on Buy and you see that I have 2 options. Buy Ethereum with Wyre and then I have the option to deposit Ethereum directly.
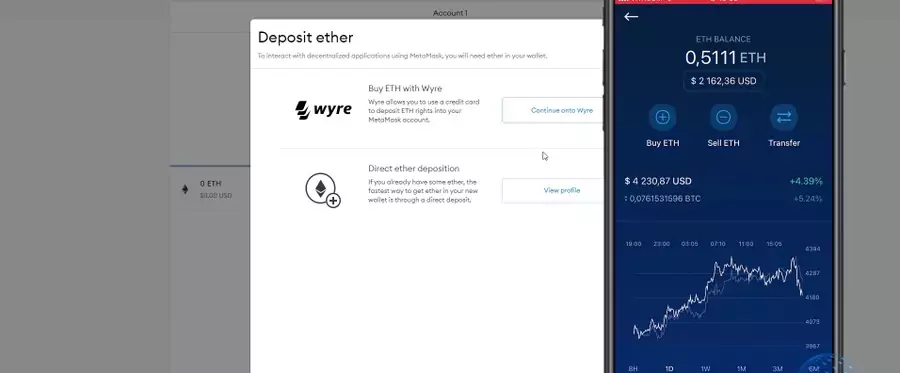
So let’s see the first option, which is Wyre. This will allow me to purchase with Apple Pay or with card payment. So let’s assume you want to purchase $40 of Ethereum which you will be using to purchase NFTs. Now, the current Ethereum exchange rate shows to be $4,417.93. And if you look at the same time on my Crypto.com app, you can see that it’s $4,224. There’s a $200 difference and that’s huge.
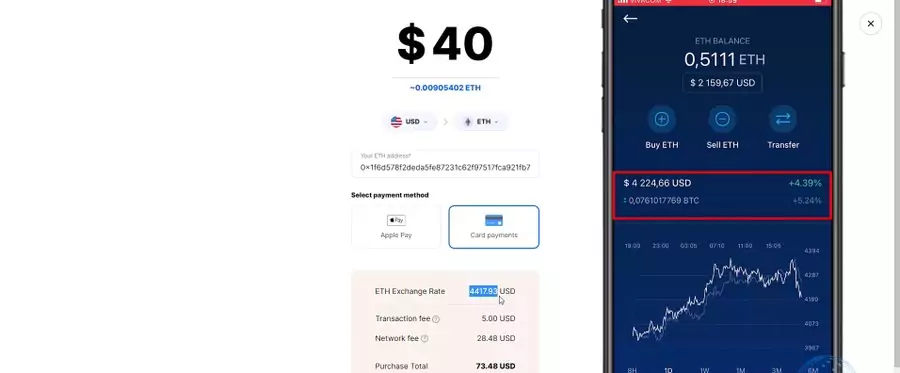
So if you are purchasing a huge amount of Ethereum, you should consider such a difference. And the better option would be to add funds from an external wallet to MetaMask rather than buying from MetaMask. If it is a small amount, there will be no such huge difference. So if I stick with the $40 example, you will see that I will have a transaction fee of $5 and I will have a network fee of $28.48 and I’ll be totally paying $73.48. That’s huge.
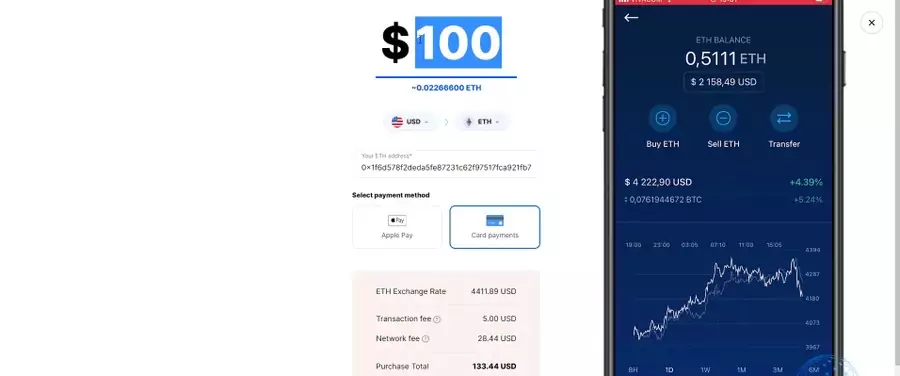
I want to buy Ethereum for $40 but I’ll be paying another $33.48. That is a huge fee for that amount. But see something interesting, if I increase the amount, let’s say I want to buy Ethereum for $50, you can see that I will be paying $83.45. Let’s increase it to $100, you will see that it’s $133.44. So the network fee doesn’t change a lot when I’m increasing the amount.
So if I want to buy $100 of Ethereum, I’ll be totally paying $133 with a network fee of $28.44.
And if I go back to $40, I’ll be paying the same network fee. So the network fee doesn’t change. Pay attention to that. So it’s not worth it for me, personally, buying $40, $50, probably even $60 because I’ll be paying like 50% network fee. Even if it’s more than 50%.
If I buy $60 of Ethereum, that would be a network fee of $28.38 and then a transaction fee of $5. That’s something you need to bear in mind.
How to fund MetaMask with transfer from external wallet
For the purposes of this MetaMask wallet tutorial, let’s take, for example, $100, and I will compare it with the other option to transfer from my Crypto.com wallet. We see that if I buy $100 of Ethereum, which is 0.02287734 ETH, that would cost me $133.18 with Wyre.
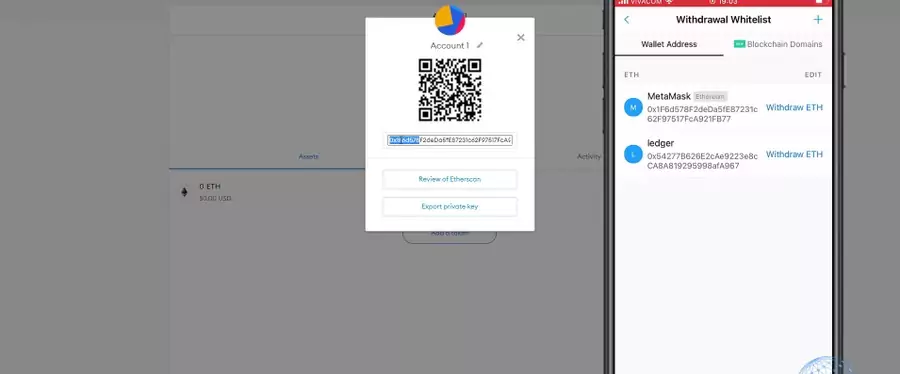
I will close that now and I will go to the second option where I can directly transfer Ethereum, and I have my Ethereum wallet address. So now, on my Crypto.com app, I will tap on Transfer, I will tap on Withdraw, and I will select External Wallet. And here, I saved the MetaMask wallet just before creating this lecture so you can see that it is the very same address.
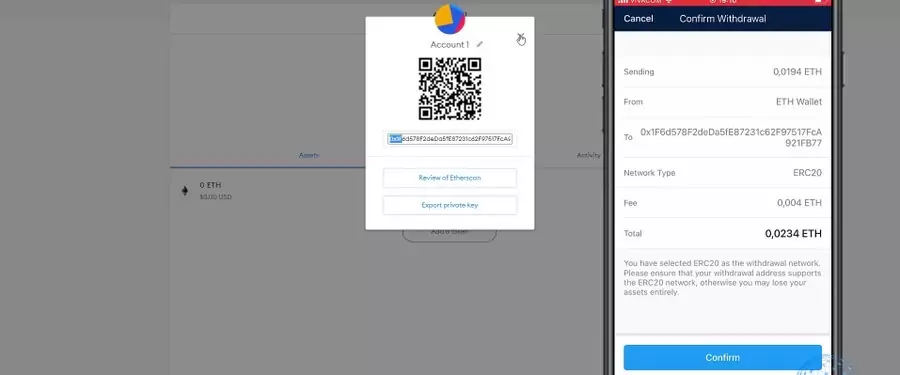
Now, I will tap on Withdraw Ethereum on my mobile and it gives me by default $100, which you can see is equal to 0.0234 ETH, which is a little bit more than 0.0228 ETH. And this is because of the difference in the exchange rate. Now, if I tap on Withdraw, you will see that for this $100 I’ll be paying a fee of 0.004 of Ethereum, and totally, I will be sending 0.0234.
And I will actually receive 0.0194 ETH. So let me go back and increase a little bit the value to $120 or let’s make it actually $133.18. This is how much I was about to pay totally if I wanted to buy from Wyre. And I tap on Withdraw and you will see that the fee doesn’t change. So if I cancel it and I increase it to $200 which would be 0.0469 ETH and I tap on Withdraw, you will see again the fee of 0.004 ETH.
So the first conclusion here is that it’s not worth it to fund your MetaMask wallet with a small amount of crypto.
For example, if I want to send, let me switch to Ethereum, if I want to send 0.01 of Ethereum which is about $42 and I tap on Withdraw, you will see that I’m still paying 0.004 of Ethereum and I’ll be sending actually 0.006. So I’m paying like 40% fee and I’ll be getting just 60% of this $40 or $42.56 with Wyre.
For me, sending less than $100 really doesn’t make sense because I’ll be paying the fee anyway. So if I want to send $100 to my MetaMask wallet, I will tap on Withdraw. You will see that I’ll be sending 0.0194 ETH. My fee will be 0.004 ETH and my total cost will be 0.0234 ETH. And I will tap on Confirm, I approve it with my fingerprint, and it says, ‘Your ETH withdrawal request has been submitted.’
It will take a while before I see the Ethereum on my MetaMask account. But one more time, pay attention to the fees, the costs, and see for yourself is better to fund your wallet from MetaMask straight away or you better transfer crypto from an external wallet.
So below, I have the withdrawal which is pending. If I tap on it, I can see some details. But totally, one more time, I have paid 0.0234 Ethereum. I’m sending 0.194 ETH and my fee was 0.004 EHT. That was a cost of $97.16. Why is there a difference? Because while I was explaining everything, the rate changed and it was not $100 anymore but it was $97.16. So while I’m waiting for the Ethereum to arrive, one more time, I want to compare it.
My observation about MetaMask funding
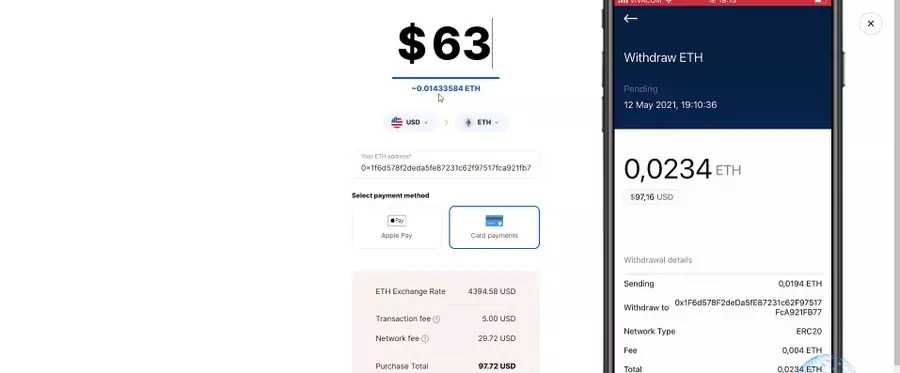
I have paid $97.16 and if I want to buy that much right now using Wyre on MetaMask, let’s see if it would be more or less. So if I am buying, let’s say, $80, I have a total purchase of 114 USD. So let me reduce it for the purpose of this MetaMask funding tutorial. If it’s $70, 104 USD. I will go down to $65, no, 99 USD. No. I will go to $63, 97.16 USD. Alright, so it’s $62 point something. I’m not able to do the point here.
So $62 or let’s say $63, I’ll be paying a total of $97 and I would get 0.0143 Ethereum. But sending $97 as a value would arrive with 0.0194 Ethereums.
So this is exactly what I wanted to show you. It’s much better to add money from an external exchange or wallet to your MetaMask rather than buying crypto straight from MetaMask because the network fee is higher and as well the exchange rate is worse. And this is by the time I’m creating the lecture. It could be different by the time you are reading the lecture, but I doubt it.
So I always look to buy from a cheaper place where their exchange rate is better. Now, let me close it, and let’s see if Ethereum has arrived. I will refresh the page. Be patient here, don’t freak out, and just wait for it. So I continue the lecture in just 1-2 minutes time, actually. And you can see that I have 0.0194 of Ethereum on my MetaMask account, and now I am able to use it to connect my MetaMask account to the NFT platforms and spend less Ethereum for some NFTs that I might like.
Conclusion
If you have any questions about the MetaMask wallet, how you can create it, let me know in the comments below. And if you have found the MetaMask wallet tutorial for beginners useful, please leave a comment. I will see you guys in another lecture.