Overview
The EA Studio uses the acceptance criteria all across its sections like the Generator, Reactor, Validator, and Optimizer. When you import or create a strategy, it needs to pass the acceptance criteria first and then it goes to the Collection.
For instance, when you activate the acceptance criteria in the Optimizer, you are only able to see the strategies that meet this criteria.
The application utilizes the acceptance criteria in three major zones of the backtest statistics:
- Complete backtest
- In sample (training) part
- Out of sample (trading) part
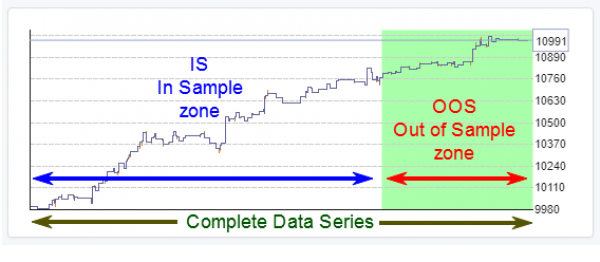
In case that you activate the OOS, the application is going to use all the zones. On the other hand, if you disable it, it will use the Complete backtest only.
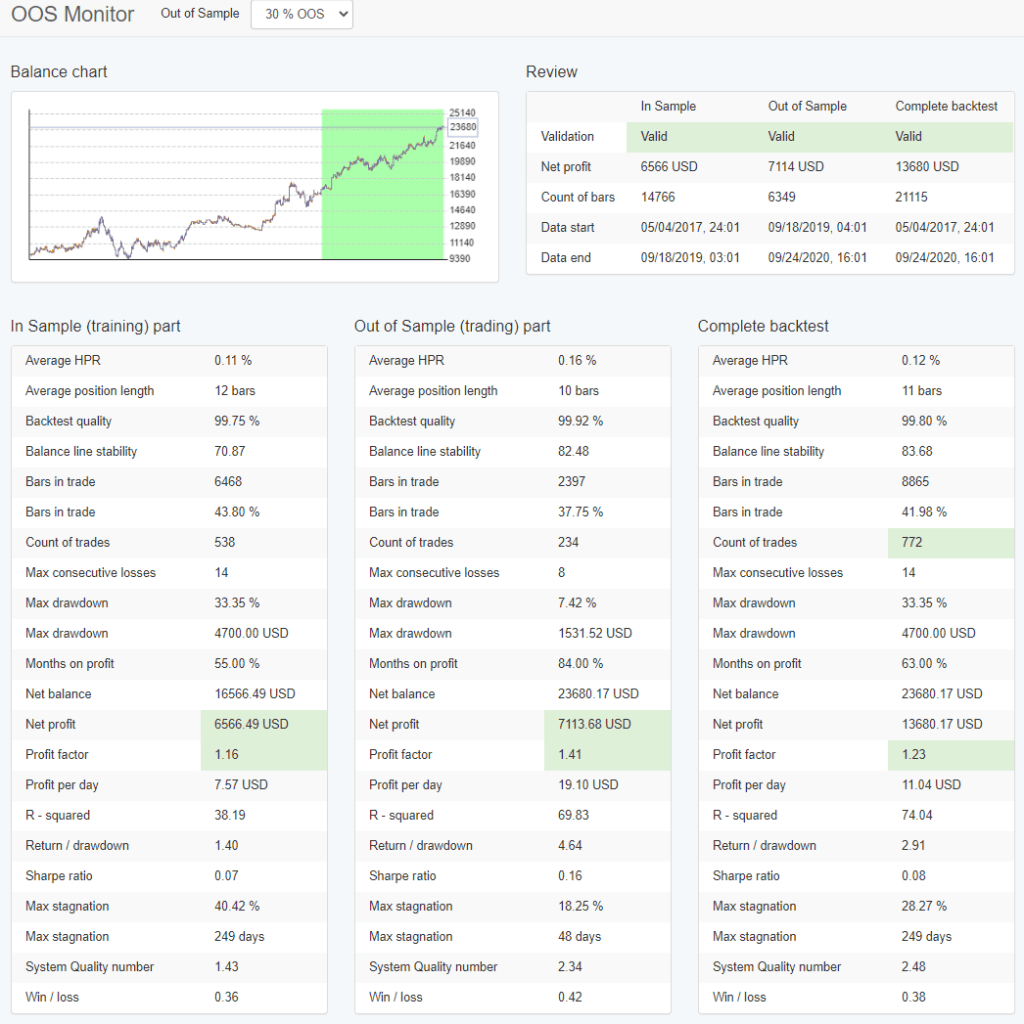
In order to view the backtest results of your strategy, go to Strategy/OOS Monitor tab or click on the Strategy/Report tab. Our advise is to use the OOS Monitor because it provides you with separate statistics of the three zones.
Let us give you an insight on how to make use of the acceptance criteria. Imagine that you create a strategy in the Generator that you really like.
You can set such acceptance criteria that will enable the Generator to provide you with more strategies like it.
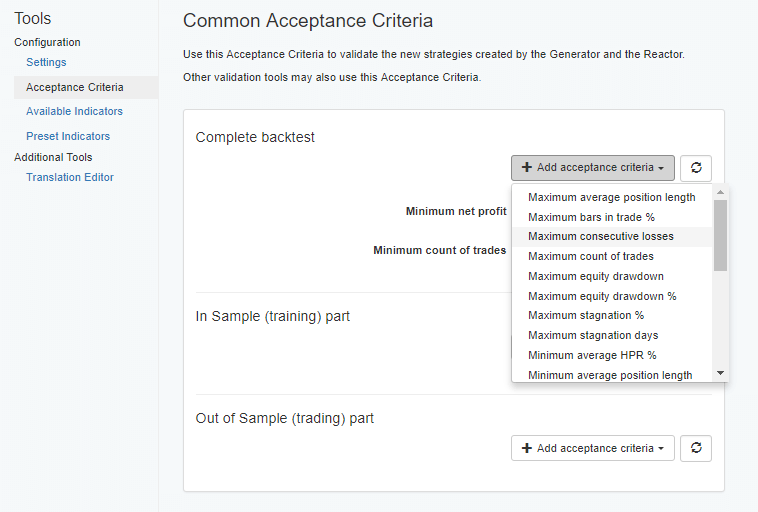
In order to check what the strategy’s backtest looks like, simply visit Strategy/OOS Monitor, and then add the preferred values in the acceptance criteria settings. Of course, they will be applied to the new strategies.
As an illustration, let us say that the example strategy has a low drawdown of only 8%. In this case, you can open the acceptance criteria settings, and set the “Maximum drawdawn” at a value that is close and not so tight to it – like 10%.
As a result, you can expect that the Generator will produce only strategies that meet this criteria.
Acceptance Criteria Metrics
Min. / Max. Average Position Length – this is the average length of a position presented in bars.
Min. / Max. Bars in Trade % – the percentage of Bars in a trade.
Max. Consecutive Losses – here you set a permissible limit of the losing trades of your strategy.
Min. / Max. Count of Trades – we advise you to use the maximal number of trades since this saves you the risk of your strategy being over-optimized. When you have a low number of trades you save some spread costs.
However, you do not get a reliable backtest. This is especially valid for the Generator and the Optimizer. For example, a strategy with a win/loss ratio of 1.0 is definitely a good one, but if the number of trades is just one, then it is not trustworthy at all.
Max. Equity Drawdown – this term represents the biggest accumulative drop in your equity curve.
Max. Equity Drawdown % – here you set a particular value below which the equity of your account can not drop.
Max. Stagnation % – here you put the time percentage in which you allow the strategy to run without profits.
Max. Stagnation Days – here you decide for how many days the strategy can run without any profits.
Min. Average HPR % – this is the value for the Holding Period Return in percent.
Min. Backtest Quality – the reason why the program works so fast is that its backtesting engine uses bar data. The downside is that there might be rare cases of ambiguities in trades’ execution.
Sometimes the engine is not sure if the price has reached the low or the high of a bar. This is a necessary information when there is a stop loss or a take profit in place.
When this happens, the engine labels such bars as “ambiguous”. In conclusion, in order to make your strategy stable, you can set the most of the bars to be unambiguous.
Min. Balance Stability – the Balance Stability is a measurement of the strategy’s performance, and it blends the R-Squared, correlation and scaling.
Min. Months on Profit % – this is a very valuable option of EA Studio that shows the traders if the profits from their strategy are consistent.
Let us say that you backtest a strategy for 10 months and in 60% of the time it is profitable. This shows you that your strategy was bringing you profits for 6 months and that it was unprofitable during the other 4 months.
Min. Net Profit – here you put the minimal amount that your strategy needs to reach. This option is beneficial overall and more specifically for the Out of Sample backtest. The value has to be set in the account’s currency.
Min. Profit Factor – next, you fill in the minimum profit factor which is a result when you divide the total profits by the total losses.
Min. Profit Per Day – this is the least amount that the strategy needs to achieve per day. Again, the value needs to be set in the account’s currency.
Min. R – Squared – here you add the minimum value of the strategy’s R – Squared.
Min. Return / Drawdown – in this field you need to choose the profit/drawdown ratio.
Min. Sharpe Ratio – here you set the minimum value of the Sharpe ratio.
Min. System Quality Number – this is the strategy’s System Quality Number.
Min. Win / Loss Ratio – another important option is to add the win/loss ratio of your strategy. This is its formula:
( (number of profitable trades) / (number of profitable trades + number of losing trades) )
The value of the win/loss ratio is between zero and one. A good practice is to active this feature together with the “Minimum number of trades” and “Minimum profit per day” settings.